Wednesday, November 05, 2008

Malvern Autumn Show 2

And more photos.


This quilt was designed by Lee Brown but made by Chalybeate Quilt Group, "Kamon".

I do love japanese inspired quilts, and their simple lines, and sashiko embroidery.


This is "Quilt in a day...yeah..right (2005) by Lee Brown. Even if it took more than a day, the result is really nice.


A bit of humour, by Lee Brown "Blythe Spirit", panels and figures hand dyed.


I loved the perspective achieved by this quilt, made by Lee Brown, again, called "Byzantine", with silk, calico, and organdie.

I will spare you any more. I had a fantastic time, bought lots of fabric. The prices were down probably because of the economic crisis, so I helped support fabric merchants.

And now I need to get down to doing some actual sewing, in addition to the hand quilting that I keep for the evenings.

Tuesday, November 04, 2008

Malvern autumn show

On Saturday I was very lucky to be able to go to the Malvern Autumn Show (I wanted to go Friday but too busy with Halloween and a bag to finish, that will figure here soon).


I took my camera and am happy to share with you all the treasures I have seen. And this time I even have the names of the authors of owners for antique quilts (yes there were antiques, how lucky ).


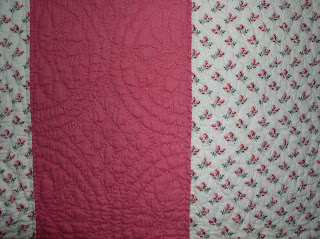
This is an old quilt called "Old Strippy" and owned by Joan Nuttall, from Chipping Norton, Oxon. She didn't know the origin of this quilt.Just look at the handy work below.


This quilt was made by Pam and Nicky Lintott, from Dorking Surrey, who own the shop "The Quilt Room" to illustrate the book Jelly Roll Quilts. It is called Pandora's Box.


And another one made by the same for the book, it is called "Garden Trellis". The fabric is from Garden Design by Moda.


Another one in the same series, they called it "Bars of Gold" but this pattern is sometimes called Stacked Coins or Chinese Coins. So simple but so effective.

This quilt is called "Williamsburg (2)" and was made in 2008 by Lee Brown from Tunbridge Wells, Kent, from the name of the collection of fabrics by Windham.

I liked the idea of keeping the fabric. It is sometimes difficult to cut a piece you love.

I have more photos but feel this post is long enough, so will publish the rest later.

Tuesday, October 28, 2008

Little pyramids of l..avender


This was an inspirational moment. I just had to start and do it after seeing some pyramid bags with a zip on the internet. I was pondering how to put the zip easily when I remembered buying some lavender this summer in a shop in Cirencester.


And so I decided to make some lavender bags in the shape of a pyramid, with a bit of ribbon to attach them to a hanger or to put in a drawer.


They are really easy to make. The only rule is that you take a piece of material that is double the length than the height. For me they were 3 1/2" x 7". I used little bits left over from projects, sometimes had to sew them together.


You fold the fabric in 2, right sides together, and sew along 2 sides, after inserting a piece of ribbon in one of the corners, so that the 2 little ends stick out.


Then fold your fabric on the open side, so that your seam is in the middle of the length to sew. You can leave 1" or 2 cm open to turn the bag out and fill the little pouch with the lavender.


I took this photo on my first attempt, when I left the hole on one of the first seams, I changed after but they all work. The idea is to have a hole somewhere.


Then, of course, you turn it inside out, fill it with dried lavender, or whatever you want to use, and slipstitch the opening closed.


I was quite pleased to have done 7 in the afternoon, but then my girls came back from school and wanted 1 each, and that's 4 gone (but I am secretly happy that suddenly they like the smell of lavender). I am hoping to be able to make some more, as little presents ready to be given.

Enjoy this quick project.

Monday, October 20, 2008

Experiments in Fimo


I saw on a blog (but didn't take note straight away so can't tell you which) that you can make buttons using Fimo paste. It is like a playdough, you can mix the colours but at the end you put it in the oven for 20 minutes at 100C, and you get real buttons.


We, me and DD1+DD2, made the shapes and then punched the holes. It was fun, still experimental, and we have a big result. Not up to selling standards, they are all different sizes.


That's my hand, to show you the sizes and shapes.


You only need a minimum to start : a sharp knife to cut the paste, something to make a hole, and websites suggest small cake cutters to cut shapes. We just bought some, haven't tried yet.


I hope this makes you want to try it. It is great fun, you can do it with children, and you can use them afterwards on bags, as decorations, etc...


Here are 3 batches on an A4 piece of paper.

Wednesday, October 15, 2008

How to make a simple bag


Our family needs something to keep our rolls of wrapping paper tidy and protected. And so I thought I could make a simple bag and show you how.


I needed a long piece of rectangle fabric, obviously, fold it in 2 right sides together, pin and sew along each side. Zigzag over the seams to make sure the fabric doesn't fray.


Cut some fabric for the 2 handles, mine was 18"x2 3/4" for each, because that's what I could use, and didn't want them to be too long; fold in 2 right sides together, sew along the long edge at 1/4", turn the handles to the right side (a bit fiddly so don't make them too narrow), iron with the seam in the middle, and topstitch twice so that they lay flat.


Iron a double hem at the top of the bag, measure and place your handle ends in the seam allowance, and sew all around the bag. Then turn it right side out, and topstitch where the handles are attached to the bag so that they are maintained flat to the top.


Et voila...


Easy, there is no lining, just change the size to make a shopping bag, or one for the children, the library, etc... Have fun with the fabrics, add pockets, or embellishments.


Mine is going to live in the cupboard under the stairs sadly, but at least it is very big to carry all the rolls. And I had the fabric for a long time, with no specific use in mind.


Go on make some bags yourself...

Monday, October 13, 2008

Quilting by hand


I have not put many posts at the moment as I am enjoying some quilting by hand. It is likely to take many more hours before I have finished, so I will only show you some photos of a work in progress.


I think the final effect is worth the effort. You may remember this quilt as my jelly roll log cabin, where I asked you which design you preferred to put my blocks together. And yes it took me that long to start quilting it...
I bought a platic template for the feather pattern. I tried to make my own template with some plastic and a special cutter with 2 parallel blades, but it was too much hard work. Tell me if you ever succeeded with that.
It is a very good thing to do in front of the tv at night, but it will take me a long time.

Tuesday, October 07, 2008

My first celtic block


I can't believe that I had never done that technique before. I have done some cathedral window, but never celtic.


The idea is that you use a bias strip to make your design on the fabric. The added detail here was the different pieces of fabric inserted in some of the space created by the bias strip.

It's not really difficult, but it takes time, a lot of time I would say.

You start by copying your design on your fabric, marking the 2 sides of your strip. You must be careful to mark the crossing points and indicate which strip is above the other. You make your bias strips by cutting your fabric on the bias, 1 1/2"wide, fold them in 2 and sew 1/4" along the cut edge. You can recut the seam allowance if you want it smaller, or leave it to give some volume to your strips.


You insert the metallic bar and iron on it so that the seam is in the middle of the strip and will be hidden when sewn down. Be careful as the metallic bar becomes hot with the iron.


Then you start pinning your strip. You can mark a strip going under by inserting a leftover bit of bias at the crossing point.


In fact it is better to have small portions of bias, as you just hide the joints at the jonction under another strip of bias. As you can see on the photo, the beginning of the first strip is hidden by another bias above it.


And so you sew around your project, you fold the bias for the points in the centre and I decided to cut some of the surplus fabric under at that point, so as to reduce the bulk.


I am glad I have finished, as it took me longer than I thought.
I will use this blog later in DD3 bed quilt, when I seriously start to work on it. Until then I have a few projects to finish, and my october bag to start.
I hope you enjoyed these quick explanations.

Tuesday, September 30, 2008

September bag for BQL

And another bag finished.


This one was our September challenge, and as you can see, today being the 30th, I have finished it just in time. If I was to be late, I would miss the pattern for October.


We used log cabins, set on point, with more log cabins cut in 2 triangles each to transform the result into a rectangle. I hand quilted it following the little logs.
I have put bamboo handles, a pocket inside and a key holder, plus of course my little label.
The flower is made in crochet with some leftover cotton thread, one that I used to knit something for DD4, but it is becoming too small for her. And so it will remind me of that cardigan.


The pattern was created by Kandy Newton from the group BQL, as in the previous months.


It is a girly handbag, and I intend to keep it for myself.


View of the inside with the green pocket, and key holder.

Friday, September 26, 2008

Do you like my cheese box ?


I found a tutorial on a french blog to transform a cheese box into a pretty, fabric covered box. First I thought it was a bit over the top, very children's club...but then I thought again. The structure is already made, even if you have to cover it with clean cardboard.

The blog is "Les Chroniques de Frimousse" and she lists all her explanations to make objects in cardboard. For this one look under "Boite a camembert decoree", there are many more. It is in French but the photos are great, and if you need any help with translation or anything, leave me a message under this post.


And so last Saturday I started with my camembert box, my cereal box, my glue and a few pegs. I used the same fabric as for my previous box, so that they match.


The result is not perfect, but I like it. I even had DD2 saying she needed a similar box.


It made me think about how we buy things so cheaply when they involve quite some work, it is called unqualified work because you don't need to go to university, but it still takes time to put things together.
I know that through my handwork I now pay more attention to the things we find in shops. Some are so expensive for what they are, and some are so cheap for the work involved. We all try to do our best to support the right products, but the path is difficult to follow.
This box in a shop would be considered a cheap product, nothing to do with the time needed to make it. Not that I would want to sell it.
Meanwhile I will go back to do some sewing before the girls come back from school, and I might even go for a little walk later to enjoy the automnal sunshine that just appeared this afternoon. Let's enjoy what we have.

Monday, September 22, 2008

What I'm up to


This past week I have done a lot of sewing...but have nothing finished to show for it. I am working on one of my UFO's, that is to be DD2's bedcover.


I have worked on my dreamcatcher quilt, making small units. I have calculated that I need 240 of them : 180 with clear triangles, and 60 with dark triangles.


So far I have made 42 dark and 51 light, so I am not yet at the middle in numbers. I have these nice piles sorted in bags.

I won't sew the blocks together yet in case I need to introduce new colors and need to spread them everywhere. So wish me luck to keep me going, still a long way.

Saturday, September 20, 2008

How to cover your measuring tape


You might remember that I have done some covered measuring tapes in the past. I wrote the explanations for our group meeting of the "Golden Lion Quilters", and am very happy to share them with you.


They are not new but it is always nice to customise the objects in your sewing bag or box.


If you have one of these self retractable measuring tapes, and find it a bit boring, this is a fast project to transform it into a very special part of your sewing kit. And after that you might even do some matching items, like a pin cushion, a needle holder, or a little tag on your scissors…


You will need:
- a retractable sewing tape,
- some fabric to cover the front, back and the side, left overs are perfect,
- some wadding or batting, very small quantities indeed,
- embroidery or quilting thread in a matching color,
- sewing kit.

1- First make a pattern for the shape of your tape. Note if it is symmetrical or not (square, round or odd shape in which case you will need to reverse you pattern later). Just draw the shape on a piece of paper, and cut it on the line.


2- Cut this shape twice in wadding, and twice in fabric after adding a sewing allowance of a generous ¼”.
Measure the length and width of the side of the tape ( and yes you can use the tape to do exactly that). Cut the wadding to that size, and the fabric once with seam allowance all around.

3- Next you will need to quilt the fabric with the corresponding pieces of batting. Don’t forget to reverse the shapes if you need to.
You end up with 3 parts to make the cover.

4- And finally you will sew the pieces together. Check from time to time that your work fits your tape measure. Start with one face and the side, you might have to sew a round shape, or a square, etc… just take your time.

Then sew the second face, and don’t forget to put the measuring tape in. Hide your knot at the end.

Bravo you have just finished your first covered measuring tape.