Tuesday, October 30, 2007

My daughter's new skirt


In the summer we had fun with my sister making a little skirt for her daughter. We did it all by hand, after buying some fabric on impulse.


I promised my daughter, number 4, that I would make her one, and now I have.


The problem is she wouldn't come in the garden to take a photo, so it is daughter number 3 who did. I am lucky it fitted her.


It is very simple as there are 2 only rectangles of fabric, and an elastic.


She is 6 and a half but quite tall, so I cut the fabric with seam allowances included:

- for the top 33"x9 1/2"

-for the lower portion 44"x11 1/4".


Sew the short sides together, right sides facing, 1/2" from the edge ot the fabric on the 2 rectangles of fabric. You now have 2 rings. Overcast side edges, as well as the bottom of the upper portion and top of your lower rectangle.


Put a gathering stitch (I can do that with my machine and a basting stitch) 1/2" from the top of the lower portion, gather until it is the same length as the top portion. Pin and sew right sides together.

Hem the bottom of the skirt by folding the fabric on itself twice, 1/4 " each time.


Fold the top of the skirt twice, making sure that it is wide enough to accomodate the elastic. Sew leaving a gap big enough to insert the elastic.


Use a safety pin to insert the elastic all the way around the top of the skirt. Attach the 2 ends securely and check on the child if possible.


Sew the elastic solidly to make a ring.


Close the seam at the waist.


Et voila.


Of course you will have to adapt to the child. Measure around the waist and the length between waist and knees, depending how long you want the skirt to be. Add enough for the seam allowances :

-1/2" at the bottom, 1/2" for the middle seam on the fabric at the bottom,

-1" for the elastic measuring 1/2", and 1/2" for the middle seam, for the fabric at the top.

You could also use different fabrics top and bottom.


But do use fabric you love and that the child loves, or your work will be in vain. Use good quality for the fabric as well as I don't know many children that sit still.


Saturday, October 20, 2007

Jeans bag


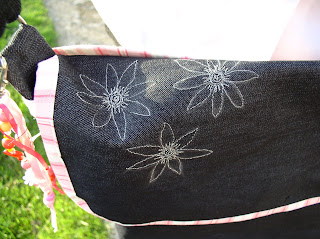
I wanted to make a bag , again from Marie-Claire Idees published this summer, in Jean fabric. And then my daughter's school bag started breaking, too many books to carry.


It gave me the excuse to start on that bag.


It didn't take long to make, and it was fun to go to the haberdashery with her to choose the buckles, and the silver thread.


The flowers were designed by daughter number 1, and redrawned by Dear Husband. Then I free machine embroidered them with the silver thread requested by dear daughter.


It went very well. I was a bit worried about the metalic thread not working, but it ran smoothly through the machine, and I didn't even need to put the reel holder upright.


My daughter had her ideas, and she accepted some of mine, like the pink flower, made from fabric left over from the bias, and gathered with a running stitch. I hand stitched the beads in the centre to hide the threads.


I put a magnetic button to close it, and doubled all the seams to make them stronger.


It was great fun.


Now I hope it will resist the strains of school. She does look after her belongings, but she carries too much.

And we made the little charms dangling from the buckle.


She was very proud of her bag, and showed it to her friends. It is all original and her choice.
This is really one of the great joys of having daughters, although they are not babies any more. I can still do some things for them, and with them.

Tuesday, October 16, 2007

My small sewing box


This is my new sewing box, carrier, I don't know how to call it really.


It comes from this book.


I received it for Christmas 2006, after seeing it in a shop, and I love it. It is different as it celebrates the little objects that were used by women for sewing. There is no plastic and you can make all the pieces in the book following the explanations and drawings.


The book is in french and is called "Ma petite mercerie" by Veronique Maillard.


You need 5 pieces of cardboard for the 4 flaps and the bottom.


Most of it is hand sewing, as you are sewing fabric around a rectangle of card.

When you have covered the 5 pieces, you prepare and sew the middle bit which is only fabric but folded in 3 to give it more body.


I added to the model as I included some wadding on the inside of one of the flaps, so it becomes a needle holder.


I am very pleased with the result and use it when I need to take some bits and pieces away from my sewing table, like in front of the telly.

No more thread rolling under the cushion or the sofa.


The cat in Grandmother's quilt

I have finished the cat in Grandmother's quilt.


You might remember that I was given a bag of fabrics, a book and some blocks. I have been working on them and made some progress, especially in the holidays, as it is all hand sewing. I am quite pleased with the result.


I have some other blocks on the go, but not quite finished.

Thursday, October 11, 2007

Little japanese bags


As I need to sort my patchwork magazines, I couldn't help looking thru them and found this small project.


It is from "Patchwork and Quilting" published in October 2004.


It was done pretty quickly although at first I made a mistake in the way you had to make the first seam. I'm getting better everyday with the seam ripper...


They look lovely isn't it, and I wonder if I will keep them or give them as presents around Christmas time.

Or maybe make more.

Tuesday, October 09, 2007

Pincushions


There must be something about needlewomen and pincushions, as I seem to have made quite a few recently.


It might be because they are quick to make, and we have a use for them.


This first one comes from a kit I received 2 years ago from my sister for Christmas. I enjoyed doing it as everything was precut, especially the tiny little dots in felt.

There is the needle holder, the pincushion and the scissors tag-thingy.


There you have 4 of them.


The one on the top left we bought in Brighton, it is a bit kitch, but very practical as it is very stable when you are half looking where you are putting your pins.

The one at the bottom left is my latest, just finished. It is for daughter number 2.


It was a project we started in my patchwork group "Golden Lion Quilters". They meet in Swindon, Wiltshire, UK, on Wednesday evenings every 2 weeks from 7 to 9 pm ( contact Frances Tel 01793 825382).


We made 2 squares in cathedral window, and joined them together to form a little cushion. It is all hand sewed. A quick project to use little bits of leftover fabric. The seam between the 2 squares is hidden by the purple squares.


This little one is called a "biscornu".


I faithfully copied a design published on a french website called "Au bout des doigts", although I cannot find it there any more. You can see the instructions in french there.

Or in English with beautiful photos here.


It is made with only 2 squares embroidered, here in cross stitch, and sewn together with one corner in the middle of the other square's side. You need the photos to fully understand.


And here is the other side of my Biscornu.


Thanks for visiting my blog.

Wednesday, October 03, 2007

Bird print Cushion


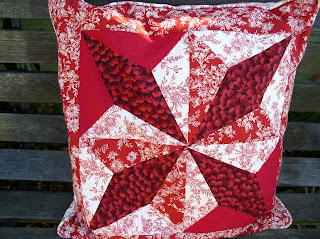
This is a cushion I made from the book "Egg Money Quilts" by Eleanor Burns.


I really love her technique,which makes for very precise blocks, because you first cut the pieces a bit oversized, and then precisely cut them again for the finished size.


She is also looking for a method to make things easy, just what I need.
Her book includes cardboard templates which are very easy to use.
As you can see I was in my red period, and used fabric from my stash.
The fabric for the back is very french, a bit like a Jouy Toile.