Friday, October 21, 2011

The story of Tristan in Boutis at the V&A London.

This summer, in the South of France, we visited the Boutis Museum in Calvisson. We were lucky to meet the creator at the origin of the Museum, Francine Nicolle, and she gave us a long explanation of a copie of a boutis made by the women of her group. The Tristan Quilt.
She has bought an original, very ancient boutis, one of 3. Another one is at the Victoria and Albert Museum, in London, England.
  A few weeks ago we took all the family to the V&A and found the boutis. You can do the same by entering this immense Museum through the main door, and go right straight away (before reaching the shop) down some stairs. This area covers the Middle Ages, and there are also some great tapestries at the end of the rooms.
 We were allowed to use the flash on our camera, but sadly this creates a reflection on the glass protecting the precious fabric.

 This is the most ancient boutis found, and it is thought to have been made in Sicily, Italy, between 1360 and 1400.
This is copied from the website of the Museum "The legend of Tristan and Isolde was a favoured narrative in the Middle Ages and appears in many forms in literature and the decorative arts. The story represented here on a quilted linen coverlet in 14 scenes, is that of the oppression of Cornwall by King Languis of Ireland and his champion the Morold, and the battle of Sir Tristan with the latter on behalf of his uncle King Mark. Although in subtle shades, the large scale designs are very clear and the quilt must have looked particularly impressive by candlelight, with lively scenes of battles, ships and castles."

 They call it a quilt, but it's not one. There is no uniform wadding. Rather the shapes defined by the stitching are filled with a cotton meche afterwards. This gives the project transparency when a light is shown behind.

 You can click on the photos to enlarge them and see the details.
There is a PDF explanation on the page from the V&A Museum.


 The boutis is very big and made of several panels. You can't even see all of it in the vitrine where it is displayed, some is folded at the top.
On the sides of the main panel are 2 other ones placed to look at people around the quilt. As this would make them more obvious if the boutis was on a bed or table. There is another panel at the bottom.


 I've increased the size of this photo but you can look on the Museum website at the PDF that gives lots of explanations.


 As you can see there is a lot to look at.


I have included a lot of photos, I hope you enjoyed them. And maybe you will get the chance to see this testament of the skills of previous artists in needlecraft.

Enjoy your sewing.
In the meantime, as it is the school holidays, I am taking the girls to northern France for a quiet week away. DH has to work so won't be accompanying us. I hope to be able to sew a bit.

Pascale.

Wednesday, October 12, 2011

A quick quilt, disappearing nine patch

Sadly in July we learned that my mother in law was not well. She lives in the South of France, very far from England in a way, and had to go to hospital. They found out she had osteoporosis, and had broken a vertebrae.
We were going on holidays there so I wanted to make a quick quilt to take with us.
 An easy pattern is the disappearing 9 patch. You sew your squares together 9 by 9, as on these 2 photos. I had some pre-cut squares and used these.

One 9 patch block

 Then you cut right through the middle in both directions.

 Finally shuffle your blocks and choose your favorite design.


 This is how I put my blocks together. I find it difficult to capture the right colour of the fabrics.


 A photo of the back, in the garden of the house we rented in South of France in August. I did some very simple quilting as I was rushed for time. The back is made with 2 pieces of small pink flowers fabric.
The folds are nothing to worry about, just the consequence of travelling a long way.


With a corner of the back.

I added a small border to make this lap quilt a bit bigger, and it's a nice finishing touch.


DD3 is showing it fully, she has growned a lot, nearly my size.


My MIL really appreciated the quilt. She said it was the first she had. I explained that I haven't made many, especially outside the close family. DD2 is still waiting for me to finish hers. It's in the work in progress pile.

I'm sorry I didn't show this before. it's only from looking through the past posts that I realised I had forgotten to show you  the photos.
I have more projects to illustrate, just need to find time to blog.

Enjoy your sewing.

Pascale

Monday, October 10, 2011

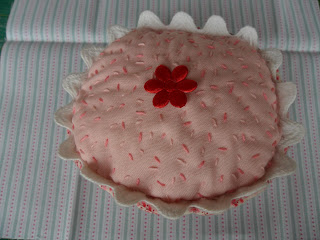
a nice little cake


As a group activity, we made some fabric cupcakes. I was hoping to take a photo of several others, but they don't seem to have been finished.

 To make a cupcake, draw a circle on your bottom fabric, including a seam allowance (you can use a bowl, plate whatever is at hand). Cut and then use wadding or felt to cut a smaller circle (no seam allowance, that's the only difference).
To get the shape I made some cuts in my 2 circles. Holding them together with pins, fold in half and cut on 2 folds. Repeat the other way, you have 4 cuts around your circle. then pinch the folds inward and sew the fabric together, making a triangular shape. The end of your seam, towards the centre of the circle is thiner than the beginning.
I repeated the process and finally had 8 seams all around. That gave me a good cupcake shape.

 The next stage is purely decorative. I used ric rac on the edge.

  I had some pink fabric for the top, but it was a bit boring, so I used 2 colours of embroidery and randomly put some stitches. I cut this red flower from a piece of flower ribbon.
Fill the interior of the cupcake with soft toys filler, or bits of wadding left over.
Sew the top fabric by hand.

And there you have a yummy cupcake. You could of course use it to put your pins in.

Enjoy your sewing.