Tuesday, March 31, 2009

March Calendar


This is my work on the March Calendar for BQL challenge.


We had to include a photo and I chose one of the family on holidays last year, to remind us of a good time, yes that's me at the back. My 2 oldest daughters are now nearly as tall as me, how time flies.


It took me a long time to get started on this project, but once I got going it was done pretty quickly. The squares are all colours from the photo, and coming from my basket of scraps. There is still quite a lot in there, not much difference from before.


I had already tried printing on fabric, to make some labels for the back of quilts; but I had never used a photo. I think it works really well, and I didn't lose too much definition.


Now back to the projects that need to be finished for Easter. Deadline coming.

Thursday, March 26, 2009

Work in progress


I am sorry I have nothing finished to show you today, but I am working on 2 things at the same time. This is all for my niece to be, due at the end of June, but we will see her parents at Easter.


I started some knitting.


And I started a small quilt, agonised yesterday over a choice of colour for the border. I spent an hour looking at all the possibilities. Here is a little preview of a block, it is called kaleidoscope, because of the effect produced when all the blocks are put together.
Obviously I won't show you the end products before the parents receive them officially, especially as the future mum has a peek here from time to time.
The deadline helps me to work fast on these 2.

Monday, March 23, 2009

Blue bags


On my last visit to the shop Dunelm I bought 1.50m of 2 blue fabrics, to make some bags. I went in because I wanted to make a present for a friend's birthday, I ended up making 4 bags, one was the present and I am hoping to sell the others on Etsy, once I have sorted a problem I have with the name chosen quickly over a year ago.


The 2 fabrics are blue, there is an inside pocket, and long handles to put the bag on the shoulder.

Wednesday, March 18, 2009

Case for my sat nav


Like a lot of you, we bought a satellite navigation system for the car. DH then mentioned that I could make a bag or case for it, instead of buying one. So off I go, with one of my japanese fabric remnants again, a bit of wadding, quilt along the lines of the design. Then I found some blue fabric, and some stick on velcro.


Everything went fine, except the velcro. Why did I bother to buy that stuff, it's horrible, and I wonder if I should bin the bit left straight away. You think the sticky part is going to make things easier, and it's the opposite. It sticks but not enough to do what it's supposed to do, like hold a bag closed. And you can't sew through it : I tried first with the sewing machine, glue everywhere, and then again with hand sewing. So I used fabric glue to attach 2 parts firmly, and then gave up, and DH bought some normal velcro...that was so easy to use.


Anyway I am quite pleased with the result, which is unique, nobody has the same.


I hope it might inspire you to give it a go, you could make a little pocket for your phone (I hope to try that soon), MP3 or ipod, or even your laptop (maybe another project).

Thursday, March 12, 2009

Japanese little bag


Last year on holidays we found a shop that was selling end of rolls of japanese fabrics. They were making and selling duvet covers. We bought a few pieces, and I have finally made that little bag that was all planned in my head.


You need 2 long pieces of fabric, one for the outside and the other for the lining, same size wadding, one coordinating zip, and a long piece of string or upholstery accessory (1metre 50).
DD1 accepted to be the model for this photo.


I found this new method for piecing it all together, where you leave a gap in a horizontal seam for turning (mine was on the lining for the zip), and then you do your vertical seams that include the outside and the lining of the bag at the same time, all turned on the wrong side of course. I am not sure if this is clear but it is shown on this blog Ptitsy Moloko, in french but the photos help.


Previously I was sewing the bag part, right sides together, and then the lining parts, right sides together. Now I can just sew them at the same time, provided that there is an opening to turn everything the right way around. It also means that the lining is stitched to the bag, and it won't move separately.

Friday, March 06, 2009

Little bear


But where did this week go...


I made a few little things, that I will show you later, I present them in a kind of order of realisation.


So here is DD3's little bear. She chose the design from the book (the same one from the Tilda series), agreed on the fabric, let me do the sewing on the machine, turned and stuffed the pieces... and she loves her dearly (it is a girl of course).


Ok now you are going to wonder why she is naked. Well she is at the moment but the clothes for the Groovy Girls dolls fit her, and they are very fashionable.

Friday, February 27, 2009

Little fabric boxes


I have 3 books written by the author of the Tilda series, Tone Finnanger, and I must say that I have used them quite a lot recently.


This one I bought in France but it is also published in English, it is called "La maison de Tilda" or "Sew Pretty Homestyle". Tone has a new book ready, just waiting for a translation, so far you can buy it in Finnish I believe.


So this project is the fabric boxes. I adapted the size to fit a certain shelf, and made a mistake while doing so, but I am sure you can manage, or just keep to the same size.


They are easy and fast to make, one big rectangle of fabric is needed. This one comes from Ikea, again, but I liked the design and the price is good. One of my boxes is made with wadding, as in the pattern, and the other without (on the right). Because the fabric is thick enough I don't think I would need wadding for the next ones.


I hope this gives you the desire to try it...

10000 viewers

I am very pleased to notice that I have had 10 000 visitors on my blog.
You mustn't doubt that I am very grateful that you think it worth coming to have a look.
I shall try to continue with my little bits of creativity.
It has helped me concentrate on making more, to try to have 2 posts per week. It doesn't work all the time, life comes in the middle, but I still enjoy this.

So again, thank you to all my visitors.

Tuesday, February 24, 2009

Washing basket


Sometimes you have to sew something for the house. This project is better than making curtains, if a bit challenging considering the shape to be covered.


We bought this lovely woven basket last summer on holidays in the North of France, and it has been waiting for some fabric cover to protect the clothes to be carried in it. In my patchwork group, I was given some long strips of fabric, probably cut from some curtains. This seemed the perfect occasion to use them.


It took me a bit of thinking to properly cover the basket, and I am quite pleased with the result.


I wondered about having a tie to keep the fabric in place, but I think the weight of the fabric is enough. Otherwise I can always sew a fold on the outside to make a channel for a tie.
I've put some tea towels inside to give a better idea of the size.

Thursday, February 19, 2009

Bag in an hour


Wandering around the net I found this tutorial for a bag in an hour, from the blog " Vintage Ric Rac", and tried it.


Of course it took me more than one hour to finish the bag, what with choosing the fabric for the outside and the lining, but I like the result.


This is synthetic fabric, so I ironed some fusible interfacing to give it more body and stop it fraying. There is also some wadding, and a magnetic clasp to close the bag.
It would be good to use in an evening, the fabric being slightly shiny.

Tuesday, February 17, 2009

Block 4 in Nature et Petits Points


I have finally done block 4, where 8 have been published, so still late. I enjoy it but there are just too many things I want to do at the same time.


I have started on block 5 already, but stopped as well. It will come in good time.


To follow other people's work, visit "Nature et Petits Points".
Here is a photo of my 4 blocks so far. They won't stay like this, but will be mounted with some fabric sashing in between.

Thursday, February 12, 2009

February Calendar


In the BQL challenge this year we have to make one little quilt per month. This is my February block.

I used the technique of Quilt As you Go to make the 4 triangles, including the lining at the back. So there was no quilting at a later stage involved. But the result is not perfectly flat, which is a bit disappointing.

I also think that the white to represent the snow that we have at the moment, doesn't show off much with a cream wall in the background. So I am wondering about some improvements like some embroidery to enliven this piece, or buttons, ribbons...
I need to find the time as well as I want to get on with other projects.

Tuesday, February 10, 2009

Cool bags


A week ago I did a workshop for the Golden Lion Quilters in Swindon, Wiltshire, on some cool bags. I prepared 2 samples to show the process and have now assembled the bags.


I call them cool bags because they are made using some insulating wadding, to keep their content cold or warm. I think they will become presents.

The cream one is quilted with diagonals that made losanges, and on the black and white I quilted around each seed.


As the fabric is quite clear I put some feet under the black and white bag. I will also use a protective spray to waterproof the outside.
And the black lining is a fabric used to make kites, so a bit waterproof also. The only inconvenient is the sewing as it is slippery.


If you remember I made the blue bag a few months ago in my BQL Challenge with the same kind of wadding, but the outside was made of patchwork blocks that took much longer. The workshop I was doing was aiming at finishing a bag in the day, or just about.
I will try to take some photos of the other ladies bags when I see them finished.

Sunday, February 01, 2009

Future finished project

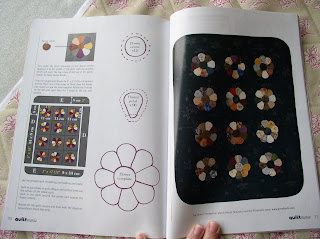
I am currently working on a small quilt, to be put on a very nice table inherited from my grandmother. In fact it is a sewing table, with little compartments to put your things away. I would like to use it but at the same time I know it is too small for all the little things I use for sewing.


It is currently covered with a Christmas theme little quilt, made with the technique of reverse paper applique, and has been for 2 years. It is time to change it, until next Christmas.


This new project I found in Quiltmania n65, spring 2008, and it has a little Japanese air to it.


I have made 6 blocks so far, so am halfway there. Each little flower uses a bit of my left over fabrics.
I copied every piece on freezer paper (in my case the paper wrapping copier paper), which is then ironed on the fabric.
The flower is hand sewn together, and then appliqued by hand again, not omitting to take the freezer papers away before closing the last petal.
I hope to be soon able to show you the finished product.

Friday, January 30, 2009

How to use a hand held sewing machine in Bangladesh.

This is my first attempt at putting a video on my blog, I hope it works. I found this on "Histoires de boites a couture", a blog in french written by several authors on all things related to sewing. There are also some videos of old american ads for Singer sewing machines.

Don't take the video at the first degree. I believe it is ironic.

http://uk.youtube.com/watch?v=NdjOyG6NnCA

Sorry I can only manage a link to You Tube to watch it. I've tried several times with other ways, no success. At least it works.

Now thanks to Nathalie L I have done it, so proud of myself.


Friday, January 23, 2009

A little mishap


This didn't end up as it was supposed to.


I really like it, but I intended to make a sewing purse for my niece and it is way too big. I started thinking that she would need space for some long scissors, and to keep her projects in, so I aimed a bit big.


It is only when I had done all the quilting, put the zip in and started to sew the sides that I thought maybe it wouldn't be that small.


I bought her, yes sorry there wasn't enough time to do another one, something else and filled it with goodies, including a pink needle holder . She loved it so everything is well.


I am keeping this purse/big bag, how to call it, and will use it to store fabric near my sewing table, and protect it from the light. I love the finished product, bright colours.


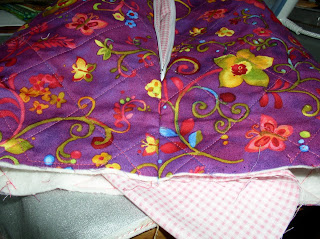
These photos show you the fabrics used. A fat quarter of the purple with flowers wasn't enough, so I added some pink for the bottom of the case. I quilted it with a grid on point as you can see on the second photo.


I then put the zip between the 2 ends of my piece and sandwiched it with the lining. There is a seam before and after the zip to go down the sides.


The lining at this point is a rectangle the same size as the top.


On the right is a view of the inside at this point.


Now take your project right side out, fold it and put a pin to mark the middle of the bottom, and then the middle of the sides, ie the point folded when the 2 previous ones meet.

Decide how big you want your fold to be, which will decide of the height of your case; draw a 45degree angle between the pin in the middle of the sides and the fold (see photo to understand). Sew the four corners, and then the seam in the middle. Cut the surplus fabric from the angles.


For the lining sew the sides together with the zip in the middle. measure the width of the case and draw on the lining. And following the photo pinch the angles, draw a line, sew and cut the spare corners.
On the second side of the lining, leave the first seam open so that you can turn all of the case out.
After doing that slip stitch closed.