Sunday, July 19, 2009

July block for the calendar challenge


And this is my piece for July in my challenge organised by BQL.

The technique we were using is Bargello, which I have done before with pleasure. Kandy Newton prepares the instructions for us every month, and finds something new every time. I am looking forward to next month's challenge.

I changed 2 things :

- first I sewed all my strips together to the point that they were making a tube. You then cut the tube in the other direction to get rings of rectangles of fabrics of different width. You use the seam ripper at different intervals so that your top fabric changes following a pattern that creates waves of colors. I don't know if this is clear enough if you have not done Bargello before.
You then sew each column to the next to create the pattern.

-the other thing I changed was that I quilted the top and the wadding together, and then used the pillowcase method to finish my block. I sewed the backing right sides together with the front of the block, leaving an opening to turn it right side out. There is no binding.

I like the final effect, although it doesn't look like a traditional Bargello; the effect of the waves is a bit lost, it looks more like modern art !


Sewing through a pin


Yesterday while quilting on my sewing machine, I felt that it was struggling. I checked, everything seemed right and continued and things came back to normal.

When I had finished my piece (which you will see in my next post) I looked at the back and found out that a pin had been dragged in the wadding from somewhere near the machine bed, and I sewed through it. But not only over the metallic part, I sewed through the plastic bit at the end. That's a first for me.
I took 2 pictures.

And by the way the machine is fine, the needle is not even broken, but I don't want to do it again, just in case.

Thursday, July 09, 2009

My big big bag


This year our patchwork group, the Golden Lion Quilters from Swindon, had a challenge. We alternate every year between a challenge and some work for a charity.

We were given 2 fabrics at Christmas, to be used in the project we wanted, to be finished and
presented for the end of year. And so yesterday I was able to show my bag.


I chose to use fabrics from my remnant basket,
hoping to make a difference in its volume...and forgot about the fabrics given. I only remembered on Monday as I needed to make the handles, so used one fabric there, and the other was added on the inside pocket.


The idea of the big big bag came from needing one, either to carry a quilt or other voluminous objects. This one will be used at home.


When I thought about my bag being judged anonymously by other quilters, I realised I wouldn't win anything, and then reflected on my use of my fabrics.
I buy pieces of fabric I really like, and then avoid using them, because they are too nice ! I know this is silly because the fashion will change, and they will look dated, so I have decided now to use
my nice fabrics, and make more cute things, etc...


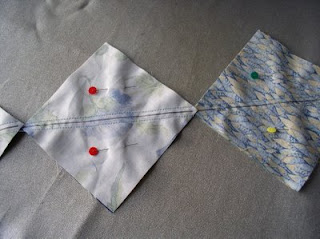
I took some photos of my sewing process to make the block. A pinwheel block is made of 4 half square triangles sewn together.

You take 2 squares, put them right sides together, iron them together so they don't move, and trace a line on one diagonal. Pin, and sew 1/4" from the line on both sides. You can chain sew them one after the other as on this photo.


You then cut on the central line and you
get 2 squares made of 2 triangles.


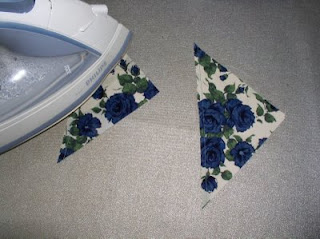
Press each triangle and then open with the iron, taking care not to stretch the bias edge.

At this stage I usually check the size and recut so that all my squares are the same.


To make the block you just have to sew 4 squares together.

Of course the tricky bit is to match all the diagonal lines in the centre, ironing is important too. Your aim is to get all the seam allowances on the reverse to turn in the same way, and then iron them flat, so that when sewing squares or blocks together the seam allowances will be on opposite sides and will lock together.
OK I should have taken an additional photo here.

If all your blocks have their seam allowances turning the same way, you will be able to sew them together very easily.

This was an easy project I enjoyed, now I have to finish a present for a little girl.

Tuesday, June 30, 2009

Phone socks

This was a quick make.
DD1 has a new phone and needed something to protect it, we bought some baby socks, cheap, cut and sewed them to get this result.

THis was the first attempt, not good enough at the end. It looked very much like a cut sock because of the heel.

Then DD2 suggested that we sewed the toe of the sock to the top part, and I made 6 of them.


In a way it looks like very strange socks.

I think next time we need to find some for older children, still cute, but with a longer ankle part so that I can do a straight seam and be done with it.

It would be a good fund raiser kind of project.

Monday, June 22, 2009

June Calendar


This month's calendar in the challenge organised by BQL was easier or faster to sew.

This is my take on it, inspired by the sea and the waves.
The result is very tactile.

I loved the fabric used for the frame, and wanted to keep the design on it visible. I think that worked.


The back below shows that there was only a little bit of quilting done, that's because with the 3D design it becomes very difficult to go between the waves.


Monday, June 15, 2009

Japanese plates table mat


Ihave finished my japanese plates table mat which was previously shown as a work in progress.


Once the 12 blocks were hand appliqued, I sewed them together by machine, and added some strips of fabric on 2 sides to fit the table. That's the only bit not done by hand, with the first seam on the binding.


All the quilting was done manually, and
again I enjoyed that.

I have even put a label on, with the name of the designer,etc...


This is beautiful if I may say so, I love it. It will be what is sometimes referred to as an heirloom that stays in the family.

Thursday, June 11, 2009

May calendar


As part of our BQL Challenge for the year, my May quiltlet had to feature some machine trapunto.
I had some practice last year in my
quilting group, so the technique was not new to me.


You need to draw your design on your front fabric, or use some tear away with your design on it, and put it in front of the fabric.
Place some wadding under the design pieces, and quilt using your favourite technique. Then you carefully cut the wadding around the stitching. You only have it left where you want more volume.


The second stage is more like normal quilting. You make a sandwich with back fabric, wadding all over, and your top. You quilt all the background surface. Here we used a method called Mc Tavishing, named from a lady who started this in America. I tried and am no way an expert.
By the way I used a variegated thread.


The design I chose is the name of one of my daughters, Clara, and a flower. She selected the colour to fit in her bedroom.


And now it is on the wall, until it can go in her bedroom. The colour seems different on this photo, but it is lighter in reality.

Wednesday, June 03, 2009

White hat


We have been on holidays, sorry for the gap in the posts.


As with all holidays, there was much preparation (cancel the milk, cut the grass...), much stress on the journey, what with crossing the Channel, but everything went well at the end. We attended a wedding in the Champagne area, guess what we drank ! and then had a few relaxing days.


Now back home, the fridge is full, and I have a few projects to finish.


The first one, started and finished on holidays, was this little white cotton hat.

With the time, and the sun, I have more and more freckles, so wanted something to protect my face. But I must say that I have a big head, so hats in shops never fit.

Nevermind I decided to make one, and it was easy.


The explanations came in the magazine Marie Claire Idees, summer number, published only in french. I went to a lovely shop in France where the owner recomended the thread. She insisted that there must be some rigidity in the finished product. I bought a crochet hook, and checked after every row that my head could fit. I made one mistake, which meant I added one more stitch per row, but it's OK. Just slightly too big at the bottom.
Oh and you get to see my face, with the little wrinkles that have appeared around my eyes, must be too much laughing...
I know that this hat is not high fashion, but I can wear it in the garden, to read a book outside, etc...and as the weather has been quite nice recently, it is pretty useful.
Enjoy the summer if you have it.

Friday, May 22, 2009

Little hens


I have seen this design many times on the net, even a video on Quilters TV.com, and I wanted to try it.
Our quilting group theme was log cabin, and I knew what to do with my little blocks.


There are 2 log cabin blocks, the center of the block is 1"square finished and the logs are 1/2" wide around it. The finished block measures 4" plus the seam allowance.

Then you need to prepare:

- the beak of the hen (I used a 2"square of fabric folded on the diagonals),

- the comb (draw the shape on paper, put it over the fabric doubled and sew around. Cut around with 1/8" seam allowance and dent the round parts, turn around),
-and the tail (same technique as for the comb).


Place the beak and the comb on the right side of a block, seam allowances aligned, on the light part of the log cabin for me. I did a quick seam to maintain them in place, hidden in the seam allowance.
Put the other log cabin block right sides together against the first one, pin and sew around 3 sides that will be the back, the front and the belly of the hen. Leave a gap on the belly to turn your hen out.


Then pin the tail inside the hen, centered on the seam, you are giving your hen its shape. You open the hen bit that is not sewn, and move the seams you have just made so that they are opposite each other. Sew across as on the photo.


Now you just need to turn you hen the right way out, and sew some eyes if you want to make it safe to be used by children, or sew some buttons if you want a bigger effect.


This hen can be used as a toy or as a pincushion.

It was so easy and nice, I made another one straight away.

Wednesday, May 20, 2009

Malvern 2009

On Saturday I was very happy to be able to go to the Quilts UK Malvern patchwork and quilting show. I have been doing this for a few years now and it is my treat of the month, I'm like a child in a sweet shop. Each time I feel I could stay longer and see more things.

The weather wasn't the best, and I got drenched walking back to my car at 5 pm.

There was a meeting organised for the members of the internet group BQL at 1pm near Susan Briscoe's stand in the marquee. There I met Mary A, Marian K, Anne, Margery and of course Susan Briscoe, but she had to stay in. I felt very proud to be told that my blog was being followed, by a real person. We all went outside to eat our lunch between 2 showers, horrible weather at the moment.

I looked at lots of shops, bought a little, and had a chat with all the french people I could meet. There were 2 women on separate stalls: Isabelle from Creative Quilting, who has a shop in Surrey, and Julie from Loving Fabrics who was recognisable from her accent, such a warm woman selling Toile de Jouy, between other things.

I also had a long chat with the owners of a new company, no affiliation, who started 8 months ago to import australian patchwork and sewing magazines to the UK. Alison created Manor House Magazines and sells to shops as well as private subscriptions. She offers several publications and explained that she receives them a week after they appear in the shops in Australia, because they are printed in Asia and sent directly to her in Marlborough. Her website is www.manorhousemagazines.co.uk
I think it is nice to see somebody creating a company in our crafty domain.

I won't show you any photo because of the copyright laws, but it was a great show. Now I'll wait for the autumn one, as I won't be able to go to the Festival of Quilts in August in Birmingham.
Back to some sewing.

Friday, May 08, 2009

My little cup of tea,


This is my last portable project, started on the ferry bringing us back from Le Havre, France, at Easter. The journey was over 5 hours so I had plenty of time, nothing else really to do on a ferry, and no restriction about scissors or needles like on planes.


This was made almost all the way by hand in consequence, except yesterday when I finished it with my machine.


This is my second one, the first one having been given away, as soon as it was finished. But this new one so far I wish to keep.


I know if I was to do another one, it would be wider and not so tall, so that you could easily reach what is at the bottom. We'll see if it happens.


So this little purse is hand quilted, with a zip, a label on the pull that says "TEA", and completely lined.
Oh and the real tea cup is one of ours and comes from Russia. I bought it for my husband when we were still living in France, but we don't use it so much now. Just mugs most of the time.

Wednesday, May 06, 2009

Block 5 in ribbon embroidery


A long time ago, I think it was over a year, I started this project organised by Pascale in France on her blog "Journal d'un Atelier", and then the secondary blog for this project "Nature et petits points" which is the name of the project. I think she is very busy with lots of new realisations, but I am still behind on block 5 when she has published block 8. I intend to finish this, it will just take me time.


So here is block 5 in ribbon embroidery, and I have put a photo with a ruler so that you realise how small this is.
There is a basket of roses, some lavender and 3 butterflies.
Now on to the next UFO to finish.

Thursday, April 30, 2009

April Calendar


This a my April Calendar in the challenge organised by BQL.


We were asked to create 9 little bags with the technique of the reverse applique, which I didn't do on paper but using a tear along support. I redrew the bags as I couldn't print the models in the right format, and really enjoyed that. After putting the quiltlet together I free machine quilted it. The finished size is 12 1/2" square.


I had great pleasure in doing this project, and I think the girls really like it as well, so it might go in a bedroom upstairs in a month.

Monday, April 27, 2009

Still here

I know it is 2 weeks since I last posted, a long time on blogland, very busy in my land.


Now the holidays are over, friends have left us, sadly, no visits planned in near future, so I should be back on my sewing machine.


2 things I can show you, where there is progress but nothing is finished yet :


first my little japanese inspired blocks, they are all done and need to be assembled and quilted.


Second my April Calendar is on its way and must be finished before the end of the month, with a photo on this blog by then. That should be the subject of my next post....coming soon.

Thursday, April 09, 2009

Exhibit at Intel


Busy week, with the school holidays and the children at home. I managed at the week-end to put some of my production in a display at Intel (the offices for Europe are in Swindon) thanks to my DH.


And then I was very happily surprised to sell some staight away. So people do appreciate what I am making.


So far I have given things away to friends and family, it is the second time only that I sold something.


The other point about this is that I have been making quite a few things, and can't expect to keep them all, I need the space. And then with the money I can buy more fabric!
But at the moment I am not making much, haven't touched a needle all week. That's terrible. And next week will be busy as well, with a very dear friend coming over, so good times coming.
Oh well !