Tuesday, December 25, 2007

I wish you a Happy Christmas


Sorry I haven't been present much lately, because of the holidays, travelling to France and seeing some family and friends. I haven't done any sewing lately either. Just knitting a scarf for my daughter, because I can do it in the car.


The only thing I can show you are some decorations I made in previous years.


This is our advent calendar. It came as a back panel, with bands of fabric to be sewn to make the pockets. Of course the numbers are put at random.


We made this little cube in our patchwork group. The cardboard inside comes from cereal boxes.


This I made quite quickly, each star or tree is in two fabrics, one on each side, with wadding in the middle, and free motion quilting on top. They are attached onto a grosgrain ribbon with a nice red button. And the ribbon makes a loop to attach to the tree at each end.


This hanging is made with triangles of fabric, 2 colors sewn together, here green and red.

Sew right sides facing, all the way, leave a gap to turn, take away some fabric in the angles. Turn to have the right way out, slip stitch closed.


Next you need to attach each point to the centre, for me the red points meet in the middle of the green triangle.


Last you need to turn the unit, here on the red side, and pull the middle of each side to the centre of the triangle, so you have green coming back to the centre of the red triangle.


You need to sew all the units together to obtain the shape of the tree. I had 15 units, 1 at the top and 5 at the bottom.

I added little gold beads in the centres.

Enjoy this day, I wish you a lot of happiness.

Thursday, December 20, 2007

Quilt for the hospice


As I cannot show what I am working on at the moment, I will show you this quilt made last year with my patchwork group to be given to the local hospice.


We all followed more or less the same pattern, with a nine patch block, but the results were all different of course. Some put their blocks together with sashing, some were straight or on point like mine.

The hospice was very happy to receive them.


As our next work for a charity our chairperson offered to give some cushions, and her offer was politely rejected on health and safety grounds.

This is very disappointing, as we could have provided new, fire treated pads; or they could have put the pads themselves.
So our brief is to make cushions that will be sold to the public on behalf of a charity.

Wednesday, December 12, 2007

Toy bags for Christmas


As I was tidying daughter number 4's bedroom, I realised she needed a toy bag. And as things go I have made 3 now.


I started with 2 using some fabric I bought from a sheeting factory, sadly closed now, in Northern France. I kept the width to be the height of the bags.


But they were too blue for a girly bedroom, as you can see below.


So I decided to do another one more pink, still using fabric I already had, and this is the result, at the top.


I must explain that being the youngest she has the boxroom, so called by the Victorian, because it was mainly used to store boxes.
It is big enough for a bed and some cupboards, but her toys are the most voluminous of the girls -you know small children, big toys, and as they grow older, the size of the presents shrinks, and the prices escalate. So her bedroom looks very often untidy when she is playing in it.


Will it work, I wouldn't bet on it...but it might help to keep some things in order.


And the 2 other bags, they will be for her 2 cousins; and their mums, if they see this, must keep it quiet.

I think I will hide the knots on the drawstrings first.


Enjoy these last few days before the big one. I have 3 nativity plays and a concert by the school to attend in the next 6 days. You do get into the spirit of the moment.

Saturday, December 08, 2007

Christmas projects


The weather is terrible in the south of England, it feels like it's been raining for days. They are so short and we don't see much of the sun with all these clouds...but I'm busy preparing things for Christmas.


I can't show them as they are presents. There is a bit of sewing, some crochet on the go. It will all be revealed later.


I have also made a Christmas stocking for my youngest daughter. The first 3 were finished at least 2 years ago, and there was one missing.


I used a free design from Eleanor Burns, so that I didn't have to think too much; she is so good in her explanations. On the website you will also be able to see different blocks she offers.


I made my stocking bigger, so it can carry more presents. It was so easy, and so fast.


And here are the photos of the previous ones, more square than the new model. Of course they are all special....

Enjoy your weekend, I'm sure you are also busy preparing for Christmas.

Thursday, December 06, 2007

My fabric Christmas Tree


This is a tree we made with the help of John, dear husband of Frances, in our quilt group.


We had to cut multiple pieces of cardboard, as all the inside pieces are doubled with a padded part, including the inside of the box.


The tree is resting on a base, that can be glued on, although I haven't done it yet.

The little pyramid holds the box closed.


Inside there is a smaller box for the sweets I need to buy.


The last option is to put some little bells or anything that makes a noise, as an alarm for the sweets I suppose.

I enjoyed this project, and I am sure we will have a lot of pleasure in using it every year around Christmas.

Friday, November 30, 2007

Workshop with Jan Hassard

The photo we were given for the workshop.

Last Saturday I spent the day at a workshop with my regular quilting group, with Jan Hassard, who comes from Bath.

It was very enjoyable, not only because I didn't have any home duty, but also because of all the creativity involved.


We had a long list of fabric to bring, I had 2 bags full, because I always worry that I won't have the right one, and I didn't cut anything beforehand, just to make sure I was doing the right thing with the right colours.

Later in the day it proved to have been the right choice as several friends were saying they wished they had chosen different fabrics,...


The units are made with 2 squares sewn together 1/4"on each side of the diagonal, to make 2 half square triangles. You then add a triangle on each side of one square to build a bigger triangle, which is itself sewn with another fabric triangle.
You need to assemble 16 units to make one block, and the blocks put together make a secondary pattern.
Jan Hassard had brought a few quilts which were all wonderful. She told us a bit about her teaching and the groups she attends, and then finally it was time to start....the day went very fast indeed, and at the end I still wanted to work, and in fact did a bit more at home later.


I will now continue to make the blocks until I get enough for a single bed quilt for daughter number 2.
It goes quickly as I do a lot of chain work, to make many blocks in one go. The cutting takes some time.


And I might run out of fabric as I am using all my batiks, but they look wonderfull, and they must be used at some point. Maybe it will reduce my stash if I resist buying some more.

Tuesday, November 27, 2007

Chloe's quilt


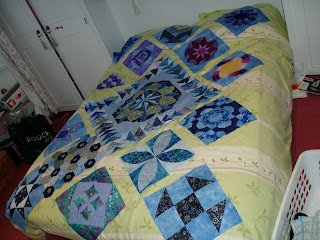
This is my daughter's quilt. Very beautiful, very big, it took me a long time to make.


All the blocks are on point, with corner and side triangles.


I didn't follow a pattern, just made the blocks one by one, I had to draw them to size most of the time, and they are all different.


My daughter had told me she wanted it blue, but by the time I had finished it she wanted her bedroom painted in pink. We changed the color of the wall, but not the quilt. She is still very proud of her quilt.


I have put a photo of the work in progress, spread on a double bed, to give you a better idea of the size, as we took the other photos in the garden when the weather was still nice, and the light good.


There are some stars and some japanese folded patchwork.


The centre was bigger than planned and I had to change my
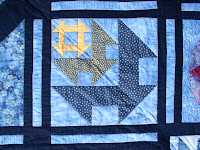
sashing. That's why it is a single sashing around the centre block, and triple around the other blocks. That way it worked, and it's even more original !


Some baskets...


Som hawaian applique, all turned under by hand.


Some bow tie blocks making a secondary pattern, some tumbling blocks.


And a round block.

I will stop here as I have trouble inserting more photos, ... if you really miss the others, send me a message and I will include them in a new post.

I hope you enjoyed this post and will feel encouraged to try a new project, search for different blocks, and challenges.

I have certainly learnt a lot trying to overcome some difficulties, and when I look at it I really feel it was worth the effort.

Oh, and it was all quilted by myself on my sewing machine, with some free machine quilting that doesn't show on the photos.

Friday, November 23, 2007

Covered measuring tapes


Surfing on the french web I saw these measuring tapes covered in different fashions. Apparently you can do the shape of a house, or whatever takes your fancy. I wasn't that brave yet, and just covered mine with quilted fabric.

I copied the shape on paper, to become my pattern. And then cut the fabric with seam allowances, and the wadding without seam allowances. Of course everything is stitched by hand.


I think I will do another one for me soon.

The beige one with a flower will be my Christmas present that we exchange in my quilting group. It is a challenge to find something every year as it has to be very cheap, no more than £3.00.

The pink one is for my daughter.

Thursday, November 22, 2007

Sashiko cushion


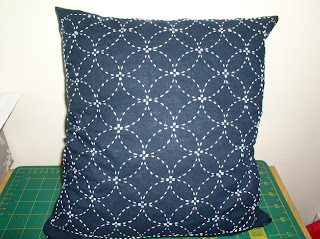
Tada!...here is my new cushion.


Done very quickly thanks to a kit from Olympus with the sashiko stitches drawn on blue fabric. Although looking at the catalogue the model I made doesn't appear, you would find other very nice projects.


And so I bought in Malvern last year the marked fabric, some sashiko needles and thread. I stitched quickly, plus a zip and you have a new cushion cover.


It was nice to have some hand sewing to do, in the car or at home.

Thursday, November 15, 2007

Tiny doll


I found this little doll explained on the blog Croix Patch 74, it is in French but the photos are great to explain. It is a small project, by the size and the time it takes, and very enjoyable.
There seems to be 2 versions, one with a point to the bottom, and the other with the point folded to the centre. You choose.

Wednesday, November 14, 2007

New, very pink, bag


Daughter number 2 wanted a bag inspired by the cover of a book. She is the one who really loves things handmade by Mum, as you can see with the scarf I made last year.

I think the book is "Making vintage bags: 20 Original Sewing Patterns for Vintage Bags and Purses" by Emma Brennan". We just took inspiration from the photo.


She chose the fabric, we went in town together to buy a few bits, et voila...


The bag is lined and closes with a pink zip at the top.
It was fast and fun to make.

Friday, November 09, 2007

Atelier rouge - progress


I have made some progress on my blocks for the atelier rouge, started by Pascale in France. We have a deadline now of finishing by the middle of December. I am not sure I will make it.


I added the sky with the bird nests and the satellite dish over the houses.


I completely changed another block, just kept the size the same.


Instead of a traditional village, I chose to do an african village. It was fun to do, although I first had to find a design for the house.


I have started working on the central block, the earth.


I have decided to change the blocks left to be done, maybe not all of them though.


So wait and see...

Wednesday, November 07, 2007

Mug purse


I needed a present for a friend's birthday, and rather than running to the shops with no idea of what to buy, I prefered to make her something.


I have been sorting out my magazines and had cut out this picture of a purse in the shape of a mug. I copied the idea and took photos all the way through so you can make one too.


I first made a paper pattern of the size I wanted. Big enough to get your fingers to the bottom, but small enough to take in a bag.


I cut my front fabric and wadding roughly to that size, and the two sides of the lining. Then I cut the shape for the bottom, plus fabric, lining and wadding.


My zip is in a matching colour, blue here, to keep the theme of the china fabric.


Cut 2 squares of fabric and 1 wadding for the handle.


I started sewing with the zip. With your special foot, or by moving the needle on the sewing machine to one side, sew the zip to the top of both sides in the front fabric.


Then sew the lining to the inside of your purse, you should be on the same sewing line.


For the handle, sew the outside line of your pattern on the wadding and 2 squares of fabric right sides together, cut around with your seam allowance, and finish by hand. You will have cut the wadding next to the sewing line, and on the pattern line, before closing the handle.


The next stage is to insert the handle on the side and close the sides of the purse (but not the lining).


Check that the position of the handle is pleasing, insert the wadding on the wrong side of the purse, the top touching the seam for the zip, pin. Then put the fabric right sides together and sew from 1/4 inch at the bottom to the zip. On each side.


Cut the wadding along the sewing line to reduce the bulk.


Then sew the lining right sides together, but leave 1"gap on one side to allow for the turning of the purse at the end.


With the purse wrong side out, sew the bottom (fabric and wadding) to the purse. Check by turning to the right side that everything is in place. Then do the same with the lining and sew the bottom of the lining.


Nearly finished.


Turn your purse to the right side, slip stitch the opening inside closed.


I found I needed something else so sewed 1/4" from the zip at the top to create a little ridge. It brought the height of my mug down, making it easier to use, and gave a better shape.

This photo was taken before.


The last touch is the little tea bag hanging from the top. Attach a piece of ribbon to the zip pull, and sew a square of fabric to remind of a tea bag.


Bravo, you have made your first mug purse.

I think I will have to make another one. They are really cute and they can have so many use.