Monday, September 07, 2009

DD4 new dress

You would think that having daughters I would get to sew them some clothes. But no, they are not interested any more. Not at 15, 13, 11...and then yes maybe, but really to please me, at 8. Finally.


I let DD4 choose her fabrics, and she picked one by the Japanese Lecien. She's got good taste or what. And if I bought it, I've got to use it.

I picked a raspberry pink for the fabric under. This dress is almost 2 dresses. The pattern is the same except one is longer than the other. Oh and I had to recalculate because they didn't go up to her size.

Then I zigzaged some leaves design on the front dress, and cut the holes to see the fabric of the second dress.

There is no button, zip, or other opening way to help put the dress on. And so it was good that I could try it all the way on my daughter, because when she put her arms up, it changed the width of her shoulders, and I had to make some adjustments.


The book I used is in french, " Les vetements de petite fille" by Cecile Vincent, and I loved the photos, the ideas, the colours. But I found that the explanations were a bit light, especially if you had never done anything like this. I used my own method in some parts. And there was no mention of the seam allowances, and where they should be.

It's a book to give you ideas, show you the way Cecile Vincent has done it, but you need to know how to make clothes to really be able to use it.

Saturday, September 05, 2009

August Calendar

How annoying when the computer doesn't work perfectly. I had some difficulties getting the internet these last few days, and my machine is getting slower. Time to buy a new one I suppose.

I have been sewing since my last post, but had no time to post about it. But my girls will all be back at school on Tuesday, and things should get better.

I planned (in my head) a long post about our August quiltlet for the BQL challenge. So here I go.
The idea was to use 36 half square triangles, made with 2 or more colours to make a 12 " square. When I visit the British Quilters List website I can see all the variations in design and choice of colours, and it is quite amazing.

I took some photos while working to show you my technique. Just if you are interested.

I used 4 fat 8 with slight variations in colour, 2 yellows and 2 reds. I put a yellow and a red right sides together and drew squares on the back of one. They were 3" squares with one diagonal drawn down a few of them. You really need to look at the photo.


I sewed 1/4" along both sides of each diagonal. So you start at the top of your squares, put the side of your 1/4" foot along the line on the right, follow it all the way, turn and come back on the other side of the diagonal. There is no sewing on the other lines, you use them for cutting your squares, horizontally and vertically. Then cut the squares on the diagonal : you get 2 half square triangles sewn in the middle.


You have to square them up, in my case to 2 1/2".


I then played with the design of my block, trying to find something I had not seen before. I don't know if my result has a name already, but I'm quite pleased with it.


When my design was decided, I sewed the squares following Eleanor Burn's method. I took the squares 2 by 2 in a column, and sewed them together chain piecing all the way. I then added the 3rd column, and the 4th till the last squares were all attached. I realised at that point that some had moved. See on the right of the photo below. I changed that of course.


I try to alternate the way the seam allowances go, to reduce the volume that gathers at the meeting points. That was difficult to achieve in this case, but it makes the quilting easier.


I did some free motion quilting in the yellow, which got DD3 interested. She wants to try this.
There is also a photo of the back.


Instead of binding it I used a thick thread and a zigzag stitch all the way around. Cut the fabric left and sew again. I don't think the result is as finished as binding is, so will probably go back to my usual method next time.

I'll try to post more regularly now, I've got things to show you...

Wednesday, August 26, 2009

Festival of Quilts, Birmingham

I'm back home in England, busy with some new projects to show you shortly. I just need to take some pictures.

But I wanted to tell you about the Festival of Quilts in Birmingham, which I attended last Saturday. It is only the second time I can visit since it began, mainly because I am usually on holidays in France.

This year I went with Kandy Newton, who is running the internet group British Quilters List (BQL) and whose challenges I have been making for the last 18 months. When I started I thought nobody would know if I messed around with a pattern, until I realised the designer wasn't far, and I could cross her in the street.

We hadn't really met before Saturday, but I felt really happy to know her. She is full of energy, and talent, ... and quite tall, lucky her. We didn't stop chatting and it was very interesting.

Back to the show and I must confess that I forgot a camera, but I took some notes of the kind of things I liked in the quilts I saw. Of course I didn't see all of them as I only went for the day, and was taken by all the shops and the nice people I met.

So my favourites fabric associations were, in no particular order :
- pink, green with dark blue,
- white monochrome,
- red embroidery on white,
- dark blue fabric with orange quilting,
- some beige, green plants, yellow, and water flowing,
- cream background with orange-red, brown-grey,
- japanese: cream background with light touches of colour,
- some simple background that shows well the quilting.

And I loved all the bags and little projects offered by the shops. I resisted all the books and magazines, but not the fabrics. Only one ruler bought, and no thread although I wanted to buy some.
I'm also tempted to buy a roll of wadding, and a bag with wheels to carry my sewing machine. I'll think about it until the next show, Malvern in the autumn.

As a final note I must say that the weather is very grey here in England at the moment, and it feels like autumn, Not perfect at all.

Enjoy your sewing.

Thursday, August 06, 2009

Baby quilt

I started this project a few months ago, and finished it when my niece was born. I saw her last week, and of course she is gorgeous at a month and a half.
Her mother received my present with great joy but the weather is so hot at the moment and the baby so small, she will have to wait to use it properly.


I opted for a big quilt, not single bed size but bigger than a cot, and am hoping she will use it for longer.
As I said to my sister in law, it's only now that I have more time because my children are older. Before I couldn't make such presents, even for my own girls. In fact 2 of them are still waiting for a quilt on their beds...


The blocks are made of 8 triangles. Their size will determine the size of your block. And then you add the 4 triangles in the corner.

It is easy to draw, 2 crosses meeting in the middle, and then you draw and extend the side lines to find the corners.


I started sewing my triangles 2 by 2, joined them, then 4 to 4. My seam allowances are all turning in the same direction, so that they match when I assemble my blocks together.

I chose a selection of pale pink and green fabrics as soon as I knew it was going to be a little girl. They seem much paller on the photos than in reality, the light was too strong outside.


For the back, as I didn't have a single piece big enough, I used fat quarters and lengths of fabric that I had left. In fact my sister in law thought it was the quilt !


I quilted in the ditch. You might remember I have some tension problems with my sewing machine when I am free machine quilting. I didn't want to risk having balls of thread at the back on this quilt.

I stitched the label on the back, with the date of birth as I finished the binding after she was born.


The result is a quilt in muted colours, very pretty, to be used everyday I hope.
Enjoy and have a nice summer.

Holidays


Sorry to keep so quiet, but I'm on holidays.
The sun, the swimming pool...it's difficult to do anything in a way. Too hot.


I will post next a baby quilt I made for my niece, but in the meantime, please accept my apologies for not posting much in August.

Sunday, July 26, 2009

Potatoe bag


No I am not doing another bag, again, although there will be some. This one is very utilitarian, it's to keep my potatoes dry (no plastic bag), and slow the greening process, as well as make them more interesting.

I used some cheap and strong fabric, sewed along the sides a french seam (in France we call it "une couture a l'anglaise", an english seam), leaving 2" at the top. You sew once at 1/4" of the edge, turn the bag inside out and sew again at 1/4". This way the raw edges are enclosed in the seam.

Then you fold twice the
fabric at the top to create a channel used to pull the string and close the bag. Sew along the fold on both sides of the bag.

The next step is to decorate, either yourself or with the help of some children on holidays at the moment !

I had fun with my youngest daughter while waiting at the swimming pool.
I used some "Fabricfun, pastel dye sticks" that you just iron when you have finished.

The plan was to make a few of these for the potatoes, onions, etc...but I am quite busy it seems and just managed to do one. They are easy and fun to make so I will come back to this.

We did put more colour on this side after I had taken the photograph.

I hope this might give you some ideas.

Sunday, July 19, 2009

July block for the calendar challenge


And this is my piece for July in my challenge organised by BQL.

The technique we were using is Bargello, which I have done before with pleasure. Kandy Newton prepares the instructions for us every month, and finds something new every time. I am looking forward to next month's challenge.

I changed 2 things :

- first I sewed all my strips together to the point that they were making a tube. You then cut the tube in the other direction to get rings of rectangles of fabrics of different width. You use the seam ripper at different intervals so that your top fabric changes following a pattern that creates waves of colors. I don't know if this is clear enough if you have not done Bargello before.
You then sew each column to the next to create the pattern.

-the other thing I changed was that I quilted the top and the wadding together, and then used the pillowcase method to finish my block. I sewed the backing right sides together with the front of the block, leaving an opening to turn it right side out. There is no binding.

I like the final effect, although it doesn't look like a traditional Bargello; the effect of the waves is a bit lost, it looks more like modern art !


Sewing through a pin


Yesterday while quilting on my sewing machine, I felt that it was struggling. I checked, everything seemed right and continued and things came back to normal.

When I had finished my piece (which you will see in my next post) I looked at the back and found out that a pin had been dragged in the wadding from somewhere near the machine bed, and I sewed through it. But not only over the metallic part, I sewed through the plastic bit at the end. That's a first for me.
I took 2 pictures.

And by the way the machine is fine, the needle is not even broken, but I don't want to do it again, just in case.

Thursday, July 09, 2009

My big big bag


This year our patchwork group, the Golden Lion Quilters from Swindon, had a challenge. We alternate every year between a challenge and some work for a charity.

We were given 2 fabrics at Christmas, to be used in the project we wanted, to be finished and
presented for the end of year. And so yesterday I was able to show my bag.


I chose to use fabrics from my remnant basket,
hoping to make a difference in its volume...and forgot about the fabrics given. I only remembered on Monday as I needed to make the handles, so used one fabric there, and the other was added on the inside pocket.


The idea of the big big bag came from needing one, either to carry a quilt or other voluminous objects. This one will be used at home.


When I thought about my bag being judged anonymously by other quilters, I realised I wouldn't win anything, and then reflected on my use of my fabrics.
I buy pieces of fabric I really like, and then avoid using them, because they are too nice ! I know this is silly because the fashion will change, and they will look dated, so I have decided now to use
my nice fabrics, and make more cute things, etc...


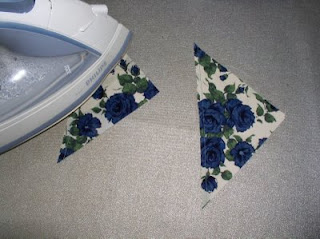
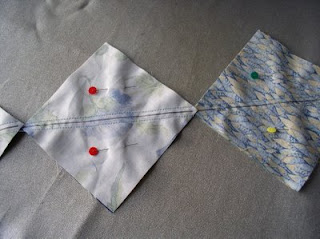
I took some photos of my sewing process to make the block. A pinwheel block is made of 4 half square triangles sewn together.

You take 2 squares, put them right sides together, iron them together so they don't move, and trace a line on one diagonal. Pin, and sew 1/4" from the line on both sides. You can chain sew them one after the other as on this photo.


You then cut on the central line and you
get 2 squares made of 2 triangles.


Press each triangle and then open with the iron, taking care not to stretch the bias edge.

At this stage I usually check the size and recut so that all my squares are the same.


To make the block you just have to sew 4 squares together.

Of course the tricky bit is to match all the diagonal lines in the centre, ironing is important too. Your aim is to get all the seam allowances on the reverse to turn in the same way, and then iron them flat, so that when sewing squares or blocks together the seam allowances will be on opposite sides and will lock together.
OK I should have taken an additional photo here.

If all your blocks have their seam allowances turning the same way, you will be able to sew them together very easily.

This was an easy project I enjoyed, now I have to finish a present for a little girl.

Tuesday, June 30, 2009

Phone socks

This was a quick make.
DD1 has a new phone and needed something to protect it, we bought some baby socks, cheap, cut and sewed them to get this result.

THis was the first attempt, not good enough at the end. It looked very much like a cut sock because of the heel.

Then DD2 suggested that we sewed the toe of the sock to the top part, and I made 6 of them.


In a way it looks like very strange socks.

I think next time we need to find some for older children, still cute, but with a longer ankle part so that I can do a straight seam and be done with it.

It would be a good fund raiser kind of project.

Monday, June 22, 2009

June Calendar


This month's calendar in the challenge organised by BQL was easier or faster to sew.

This is my take on it, inspired by the sea and the waves.
The result is very tactile.

I loved the fabric used for the frame, and wanted to keep the design on it visible. I think that worked.


The back below shows that there was only a little bit of quilting done, that's because with the 3D design it becomes very difficult to go between the waves.


Monday, June 15, 2009

Japanese plates table mat


Ihave finished my japanese plates table mat which was previously shown as a work in progress.


Once the 12 blocks were hand appliqued, I sewed them together by machine, and added some strips of fabric on 2 sides to fit the table. That's the only bit not done by hand, with the first seam on the binding.


All the quilting was done manually, and
again I enjoyed that.

I have even put a label on, with the name of the designer,etc...


This is beautiful if I may say so, I love it. It will be what is sometimes referred to as an heirloom that stays in the family.

Thursday, June 11, 2009

May calendar


As part of our BQL Challenge for the year, my May quiltlet had to feature some machine trapunto.
I had some practice last year in my
quilting group, so the technique was not new to me.


You need to draw your design on your front fabric, or use some tear away with your design on it, and put it in front of the fabric.
Place some wadding under the design pieces, and quilt using your favourite technique. Then you carefully cut the wadding around the stitching. You only have it left where you want more volume.


The second stage is more like normal quilting. You make a sandwich with back fabric, wadding all over, and your top. You quilt all the background surface. Here we used a method called Mc Tavishing, named from a lady who started this in America. I tried and am no way an expert.
By the way I used a variegated thread.


The design I chose is the name of one of my daughters, Clara, and a flower. She selected the colour to fit in her bedroom.


And now it is on the wall, until it can go in her bedroom. The colour seems different on this photo, but it is lighter in reality.

Wednesday, June 03, 2009

White hat


We have been on holidays, sorry for the gap in the posts.


As with all holidays, there was much preparation (cancel the milk, cut the grass...), much stress on the journey, what with crossing the Channel, but everything went well at the end. We attended a wedding in the Champagne area, guess what we drank ! and then had a few relaxing days.


Now back home, the fridge is full, and I have a few projects to finish.


The first one, started and finished on holidays, was this little white cotton hat.

With the time, and the sun, I have more and more freckles, so wanted something to protect my face. But I must say that I have a big head, so hats in shops never fit.

Nevermind I decided to make one, and it was easy.


The explanations came in the magazine Marie Claire Idees, summer number, published only in french. I went to a lovely shop in France where the owner recomended the thread. She insisted that there must be some rigidity in the finished product. I bought a crochet hook, and checked after every row that my head could fit. I made one mistake, which meant I added one more stitch per row, but it's OK. Just slightly too big at the bottom.
Oh and you get to see my face, with the little wrinkles that have appeared around my eyes, must be too much laughing...
I know that this hat is not high fashion, but I can wear it in the garden, to read a book outside, etc...and as the weather has been quite nice recently, it is pretty useful.
Enjoy the summer if you have it.